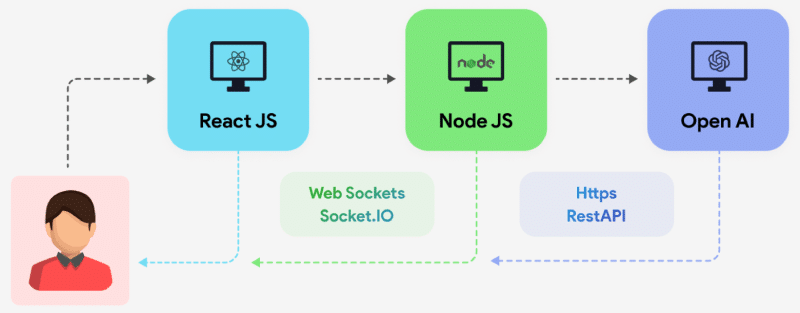
Incorporating AI-powered chat functionality into web applications is becoming increasingly popular. ChatGPT, powered by OpenAI’s GPT-4, offers a robust solution for creating interactive and intelligent chat interfaces. This guide will walk you through integrating ChatGPT with a Node.js backend and a React.js frontend.
Before we start, ensure you have the following installed on your system:
- Node.js
- npm or yarn
- A basic understanding of React.js and Node.js
- OpenAI API key (you can get it by signing up at OpenAI’s website)
Step-by-Step Integration:
Step 1: Setting Up the Node.js Backend
First, let’s set up the backend server using Node.js. This server will handle API requests to the OpenAI API.
1.1 Initialize a New Node.js Project
Create a new directory for your project and initialize a new Node.js project:
mkdir chatgpt-integration
cd chatgpt-integration
npm init -y
1.2 Install Required Packages
Install the required packages:
npm install express axios cors dotenv
1.3 Create the Server
Create a file named server.js in your project root:
const express = require('express');
const axios = require('axios');
const cors = require('cors');
require('dotenv').config();

const app = express();
const port = process.env.PORT || 5000;

app.use(cors());
app.use(express.json());

app.post('/api/chat', async (req, res) => {
  const message = req.body.message;

  try {
    const response = await axios.post(
      'https://api.openai.com/v1/engines/davinci-codex/completions',
      {
        prompt: message,
        max_tokens: 150,
      },
      {
        headers: {
          'Content-Type': 'application/json',
          Authorization: `Bearer ${process.env.OPENAI_API_KEY}`,
        },
      }
    );

    res.json(response.data.choices[0].text);
  } catch (error) {
    console.error(error);
    res.status(500).send('Error generating response');
  }
});

app.listen(port, () => {
  console.log(`Server running on port ${port}`);
});
1.4 Create a .env File
Create a .env file in your project root and add your OpenAI API key:
OPENAI_API_KEY=your_openai_api_key_here
1.5 Run the Server
Start the server:
node server.js
Your backend server is now ready to handle requests.
Step 2: Setting Up the React.js Frontend
Next, we’ll set up the frontend using React.js to interact with our Node.js backend.
2.1 Initialize a New React.js Project
Create a new React project using Create React App:
npx create-react-app chatgpt-frontend
cd chatgpt-frontend
2.2 Install Axios
Install Axios for making HTTP requests:
npm install axios
2.3 Create the Chat Component
Create a new component named Chat.js inside the src directory:
import React, { useState } from 'react';
import axios from 'axios';

const Chat = () => {
  const [message, setMessage] = useState('');
  const [response, setResponse] = useState('');

  const handleSendMessage = async () => {
    try {
      const res = await axios.post('http://localhost:5000/api/chat', { message });
      setResponse(res.data);
    } catch (error) {
      console.error('Error sending message:', error);
    }
  };

  return (
    <div>
      <h1>ChatGPT</h1>
      <textarea
        value={message}
        onChange={(e) => setMessage(e.target.value)}
        rows="4"
        cols="50"
        placeholder="Type your message here...">
       </textarea>
      <br />
      <button onClick={handleSendMessage}>Send</button>
      <h2>Response:</h2>
      <p>{response}</p>
    </div>
  );
};

export default Chat;
2.4 Update the App Component
Update the App.js file to include the Chat component:
import React from 'react';
import Chat from './Chat';

function App() {
  return (
    <div className="App">
      <Chat />
    </div>
  );
}

export default App;
2.5 Run the React App
Start the React development server:
npm start
Your React app should now be running, and you can interact with the ChatGPT model by typing messages and receiving responses.
Conclusion
Integrating ChatGPT with a Node.js backend and React.js frontend involves setting up a server to handle API requests and a frontend to interact with the user. By following the steps outlined in this guide, you can create a seamless chat experience powered by OpenAI’s GPT-4.
For professional development and custom solutions, hire the RND Experts Pvt. Ltd. team to develop your WordPress theme and plugin, ensuring robust and scalable applications tailored to your specific needs.


