
Integrating of ChatGPT with Node.js and React.js
July 8, 2024
NodeJs ,Technology ,web
Admin
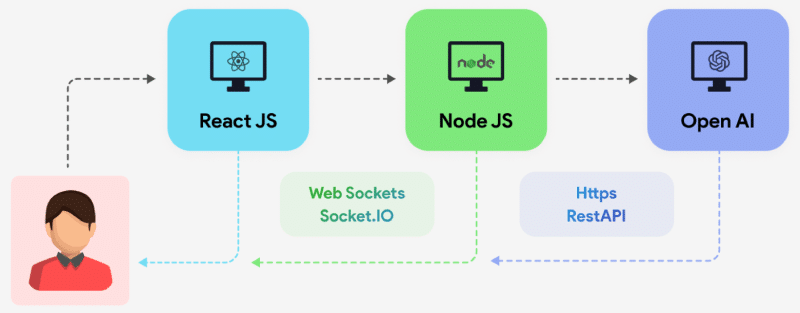
Incorporating AI-powered chat functionality into web applications is becoming increasingly popular. ChatGPT, powered by OpenAI’s GPT-4, offers a robust solution for creating interactive and intelligent chat interfaces. This guide will walk you through integrating ChatGPT with a Node.js backend and a React.js frontend.
Before we start, ensure you have the following installed on your system:
- Node.js
- npm or yarn
- A basic understanding of React.js and Node.js
- OpenAI API key (you can get it by signing up at OpenAI’s website)
Step-by-Step Integration:
Step 1: Setting Up the Node.js Backend
First, let’s set up the backend server using Node.js. This server will handle API requests to the OpenAI API.
1.1 Initialize a New Node.js Project
Create a new directory for your project and initialize a new Node.js project:
mkdir chatgpt-integration
cd chatgpt-integration
npm init -y
1.2 Install Required Packages
Install the required packages:
npm install express axios cors dotenv
1.3 Create the Server
Create a file named server.js in your project root:
const express = require('express');
const axios = require('axios');
const cors = require('cors');
require('dotenv').config();

const app = express();
const port = process.env.PORT || 5000;

app.use(cors());
app.use(express.json());

app.post('/api/chat', async (req, res) => {
  const message = req.body.message;

  try {
    const response = await axios.post(
      'https://api.openai.com/v1/engines/davinci-codex/completions',
      {
        prompt: message,
        max_tokens: 150,
      },
      {
        headers: {
          'Content-Type': 'application/json',
          Authorization: `Bearer ${process.env.OPENAI_API_KEY}`,
        },
      }
    );

    res.json(response.data.choices[0].text);
  } catch (error) {
    console.error(error);
    res.status(500).send('Error generating response');
  }
});

app.listen(port, () => {
  console.log(`Server running on port ${port}`);
});
1.4 Create a .env File
Create a .env file in your project root and add your OpenAI API key:
OPENAI_API_KEY=your_openai_api_key_here
1.5 Run the Server
Start the server:
node server.js
Your backend server is now ready to handle requests.
Step 2: Setting Up the React.js Frontend
Next, we’ll set up the frontend using React.js to interact with our Node.js backend.
2.1 Initialize a New React.js Project
Create a new React project using Create React App:
npx create-react-app chatgpt-frontend
cd chatgpt-frontend
2.2 Install Axios
Install Axios for making HTTP requests:
npm install axios
2.3 Create the Chat Component
Create a new component named Chat.js inside the src directory:
import React, { useState } from 'react';
import axios from 'axios';

const Chat = () => {
  const [message, setMessage] = useState('');
  const [response, setResponse] = useState('');

  const handleSendMessage = async () => {
    try {
      const res = await axios.post('http://localhost:5000/api/chat', { message });
      setResponse(res.data);
    } catch (error) {
      console.error('Error sending message:', error);
    }
  };

  return (
    <div>
      <h1>ChatGPT</h1>
      <textarea
        value={message}
        onChange={(e) => setMessage(e.target.value)}
        rows="4"
        cols="50"
        placeholder="Type your message here...">
       </textarea>
      <br />
      <button onClick={handleSendMessage}>Send</button>
      <h2>Response:</h2>
      <p>{response}</p>
    </div>
  );
};

export default Chat;
2.4 Update the App Component
Update the App.js file to include the Chat component:
import React from 'react';
import Chat from './Chat';

function App() {
  return (
    <div className="App">
      <Chat />
    </div>
  );
}

export default App;
2.5 Run the React App
Start the React development server:
npm start
Your React app should now be running, and you can interact with the ChatGPT model by typing messages and receiving responses.
Conclusion
Integrating ChatGPT with a Node.js backend and React.js frontend involves setting up a server to handle API requests and a frontend to interact with the user. By following the steps outlined in this guide, you can create a seamless chat experience powered by OpenAI’s GPT-4.
For professional development and custom solutions, hire the RND Experts Pvt. Ltd. team to develop your WordPress theme and plugin, ensuring robust and scalable applications tailored to your specific needs.
Stay In The Loop!
Subscribe to our newsletter and learn the latest digital trends.