Categories
Laravel NodeJs

Top 10 Companies that provide services in Serbia using Laravel stack

Selecting the best Laravel development company from this list depends on your project requirements. Here’s a step-by-step guide to help you make an informed decision:

  1. Define Your Requirements
  2. Evaluate Their Expertise
  3. Assess Communication and Collaboration
  4. Check Client Reviews and References
  5. Evaluate Cost vs. Value
  6. Conduct a Trial
  7. Verify Long-Term Support
  8. Cultural and Regional Fit

Here are some notable companies in Serbia that provide services using the Laravel framework:

1. RND Experts

Guaranteed Project Delivered on time and within budget or you will get a FULL REFUND. Since 2014 RND Experts is a trusted choice for Web Development and Design services. We have the Best In-House team for creating stunning designs for your business which is best in UI/UX, We pay full attention to project requirements and deliver on time and within budget.

Specialization:

  • Web Development using PHP Open Source Language
  • Laravel Development
  • API Development and Integration
  • Web Design
  • eCommerce Development
  • Custom Application Development
  • WordPress Plugin & theme Development
  • LMS Development and Design
  • Figma, Photoshop, Canva Design Development
  • MERN Stack Development
  • MEAN Stack Development
  • Laravel Application Development
  • Backend and Frontend Development
  • NodeJs Development
  • ReactJs, VeuJs, Angular, NextJ/NuxtJs Development

Client Video Feedback https://rndexperts.com/testimonials/

Portfolio https://rndexperts.com/portfolio/

2. Redberry

A development company specializing in Laravel applications, delivering high-quality web solutions tailored to client needs.

Specialization:

  • Web Development using PHP Open Source Language
  • Laravel Development
  • API Development and Integration
  • Web Design
  • eCommerce Development

3. Digis

Offers comprehensive Laravel development services, focusing on scalable and efficient web applications

Specialization:

  • Web Development using PHP
  • API Development and Integration
  • Web Design
  • eCommerce Development

4. Vega IT

Provides a range of web development services, including expertise in Laravel, to create robust digital solutions. 

Specialization:

  • Backend and Frontend Development
  • API Development and Integration
  • Web Design
  • eCommerce Development

5. Project Land

Specializes in Laravel development, delivering custom web applications for various industries. 

Specialization:

  • Backend and Frontend Development
  • Agile Delivery Transformation
  • Analytics & Optimization
  • Growth Marketing
  • Data Science & Engineering
  • Adobe Experience Cloud
  • Voice & Multi-Modal

6. Boopro Technology

Focuses on Laravel-based solutions, offering end-to-end web development services

Specialization:

  • Backend and Frontend Development
  • Agile Delivery Transformation
  • Analytics & Optimization
  • Growth Marketing
  • Data Science & Engineering

7. JS Guru

A full-service development company with expertise in Laravel, providing innovative web solutions. 

Specialization:

  • Laravel Development
  • Analytics & Optimization
  • Data Science & Engineering
  • Adobe Experience Cloud

8. MANE

A full-service development company with expertise in Laravel, providing innovative web solutions. 

Specialization:

  • Laravel Development
  • Mobile App Development
  • CRM Development
  • MERN Stack Development

9. Deutrix

Offers Laravel development, focusing on custom web solutions tailored to client requirements. 

Specialization:

  • Full Stack Engineering
  • Design
  • Strategy & Research
  • Agile Delivery Transformation
  • Analytics & Optimization
  • Growth Marketing

9. Pop Art Studio

A full-service web design and development agency specializing in unique WordPress themes and Laravel applications. 

Specialization:

  • Full Stack Engineering
  • Design
  • Strategy & Research
  • Agile Delivery Transformation
  • Analytics & Optimization
  • Growth Marketing

These companies have been recognized for their expertise in Laravel development within Serbia.

Categories
API NodeJs ReactJS Technology

TradeStation API integration with ReactJs

TradeStation, a leading online trading platform, offers a powerful API that allows developers to integrate its functionalities into custom applications. ReactJS, a popular JavaScript library for building user interfaces, provides a robust framework for creating interactive and dynamic web applications.

Understanding the TradeStation API

The TradeStation API exposes a wide range of functionalities, including:

  1. Market Data: Accessing real-time and historical market data for various financial instruments (stocks, options, futures, etc.).
  2. Order Execution: Placing, modifying, and canceling orders directly from your application.
  3. Account Information: Retrieving account balances, positions, and trade history.
  4. Charting and Analysis: Integrating charting capabilities and technical analysis tools.

Getting Started
Step 1: Obtain TradeStation API Credentials
First, you must
sign up for TradeStation’s developer program and obtain your API key and secret. This is essential for authenticating your application and accessing data securely.

  1. Go to the TradeStation Developer Portal.
  2. Create an application to receive your API Key and API Secret.
  3. Ensure you have OAuth set up for authentication, as this will provide the Access Token required for API calls.

Step 2: Set Up Your ReactJS Project
If you don’t have a React project set up yet, then create ReactJS Project using create-react-app or a similar tool.

Step 3: Install Axios for API Calls
We’ll use Axios to handle our API requests in React. You can install Axios by running the following command: npm install axios

Step 4: Create a Service to Interact with TradeStation API
Now, let’s build a service that will handle API calls to TradeStation. Create a new file tradeStationService.js to abstract the logic for interacting with the API.

import axios from 'axios';

const API_BASE_URL = 'https://api.tradestation.com/v3/';
const ACCESS_TOKEN = 'your_access_token';  // Use OAuth to get this token.

const tradeStationService = {
    getAccountInfo: async () => {
        const response = await axios.get(`${API_BASE_URL}accounts`, {
            headers: {
                'Authorization': `Bearer ${ACCESS_TOKEN}`,
            },
        });
        return response.data;
    },

    getMarketData: async (symbol) => {
        const response = await axios.get(`${API_BASE_URL}marketdata/quote/${symbol}`, {
            headers: {
                'Authorization': `Bearer ${ACCESS_TOKEN}`,
            },
        });
        return response.data;
    },

    placeOrder: async (orderData) => {
        const response = await axios.post(`${API_BASE_URL}orders`, orderData, {
            headers: {
                'Authorization': `Bearer ${ACCESS_TOKEN}`,
                'Content-Type': 'application/json',
            },
        });
        return response.data;
    },
};

export default tradeStationService;

Step 5: Integrate the Service into React Components
With the service in place, let’s now use it inside a React component. Below is an example of fetching account data and displaying it in the UI:

import React, { useEffect, useState } from 'react';
import tradeStationService from './tradeStationService';

const TradeStationComponent = () => {
    const [accountInfo, setAccountInfo] = useState(null);
    const [marketData, setMarketData] = useState(null);

    useEffect(() => {
        const fetchAccountInfo = async () => {
            try {
                const data = await tradeStationService.getAccountInfo();
                setAccountInfo(data);
            } catch (error) {
                console.error('Error fetching account info:', error);
            }
        };

        const fetchMarketData = async () => {
            try {
                const data = await tradeStationService.getMarketData('AAPL');
                setMarketData(data);
            } catch (error) {
                console.error('Error fetching market data:', error);
            }
        };

        fetchAccountInfo();
        fetchMarketData();
    }, []);

    return (
        <div>
            <h1>TradeStation Integration</h1>
            {accountInfo && (
                <div>
                    <h2>Account Info</h2>
                    <pre>{JSON.stringify(accountInfo, null, 2)}</pre>
                </div>
            )}
            {marketData && (
                <div>
                    <h2>Market Data for AAPL</h2>
                    <pre>{JSON.stringify(marketData, null, 2)}</pre>
                </div>
            )}
        </div>
    );
};

export default TradeStationComponent;

This component uses the useEffect hook to fetch account information and market data once the component mounts. It then renders the data in JSON format.

Step 6: Handle Authentication (OAuth)
The TradeStation API requires OAuth authentication. You will need to build a backend service to handle the OAuth flow. This involves:

  1. Directing users to the TradeStation authorization page.
  2. Capturing the authorization code returned.
  3. Exchanging this code for an access token.
  4. Using the access token to authorize API requests.
  5. Once you retrieve the token, you can securely store it in the backend or the frontend, depending on your needs.

Step 7: Overcoming CORS Issues
While developing, you may face CORS (Cross-Origin Resource Sharing) issues. You can solve this by setting up a proxy in your package.json file:

{
  "proxy": "https://api.tradestation.com"
}

Use Cases and Best Practices

  1. Real-time Quotes and Charts: Display live market data and interactive charts.
  2. Automated Trading: Build trading algorithms and execute orders programmatically.
  3. Custom Analytics: Develop custom technical indicators and analysis tools.
  4. Risk Management: Implement risk management strategies based on real-time data.

When integrating the TradeStation API with ReactJS, consider the following best practices:

  1. Error Handling: Implement robust error handling to gracefully handle API failures.
  2. Rate Limiting: Adhere to the API’s rate limits to avoid being throttled.
  3. Security: Protect your API credentials and handle sensitive data securely.
  4. Performance Optimization: Optimize your application for performance, especially when dealing with large datasets.
Categories
NodeJs Technology web

Integrating of ChatGPT with Node.js and React.js

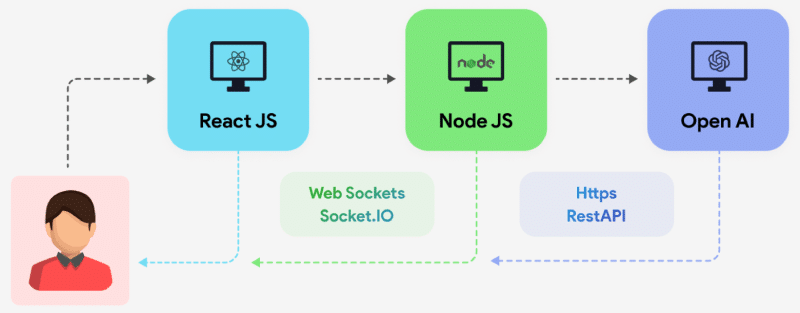
Incorporating AI-powered chat functionality into web applications is becoming increasingly popular. ChatGPT, powered by OpenAI’s GPT-4, offers a robust solution for creating interactive and intelligent chat interfaces. This guide will walk you through integrating ChatGPT with a Node.js backend and a React.js frontend.

Before we start, ensure you have the following installed on your system:

  1. Node.js
  2. npm or yarn
  3. A basic understanding of React.js and Node.js
  4. OpenAI API key (you can get it by signing up at OpenAI’s website)

Step-by-Step Integration:

Step 1: Setting Up the Node.js Backend

First, let’s set up the backend server using Node.js. This server will handle API requests to the OpenAI API.

1.1 Initialize a New Node.js Project

Create a new directory for your project and initialize a new Node.js project:

mkdir chatgpt-integration
cd chatgpt-integration
npm init -y

1.2 Install Required Packages

Install the required packages:

npm install express axios cors dotenv

1.3 Create the Server

Create a file named server.js in your project root:

const express = require('express');
const axios = require('axios');
const cors = require('cors');
require('dotenv').config();

const app = express();
const port = process.env.PORT || 5000;

app.use(cors());
app.use(express.json());

app.post('/api/chat', async (req, res) => {
  const message = req.body.message;

  try {
    const response = await axios.post(
      'https://api.openai.com/v1/engines/davinci-codex/completions',
      {
        prompt: message,
        max_tokens: 150,
      },
      {
        headers: {
          'Content-Type': 'application/json',
          Authorization: `Bearer ${process.env.OPENAI_API_KEY}`,
        },
      }
    );

    res.json(response.data.choices[0].text);
  } catch (error) {
    console.error(error);
    res.status(500).send('Error generating response');
  }
});

app.listen(port, () => {
  console.log(`Server running on port ${port}`);
});

1.4 Create a .env File

Create a .env file in your project root and add your OpenAI API key:

OPENAI_API_KEY=your_openai_api_key_here

1.5 Run the Server

Start the server:

node server.js

Your backend server is now ready to handle requests.

Step 2: Setting Up the React.js Frontend

Next, we’ll set up the frontend using React.js to interact with our Node.js backend.

2.1 Initialize a New React.js Project

Create a new React project using Create React App:

npx create-react-app chatgpt-frontend
cd chatgpt-frontend

2.2 Install Axios

Install Axios for making HTTP requests:

npm install axios

2.3 Create the Chat Component

Create a new component named Chat.js inside the src directory:

import React, { useState } from 'react';
import axios from 'axios';

const Chat = () => {
  const [message, setMessage] = useState('');
  const [response, setResponse] = useState('');

  const handleSendMessage = async () => {
    try {
      const res = await axios.post('http://localhost:5000/api/chat', { message });
      setResponse(res.data);
    } catch (error) {
      console.error('Error sending message:', error);
    }
  };

  return (
    <div>
      <h1>ChatGPT</h1>
      <textarea
        value={message}
        onChange={(e) => setMessage(e.target.value)}
        rows="4"
        cols="50"
        placeholder="Type your message here...">
       </textarea>
      <br />
      <button onClick={handleSendMessage}>Send</button>
      <h2>Response:</h2>
      <p>{response}</p>
    </div>
  );
};

export default Chat;

2.4 Update the App Component

Update the App.js file to include the Chat component:

import React from 'react';
import Chat from './Chat';

function App() {
  return (
    <div className="App">
      <Chat />
    </div>
  );
}

export default App;

2.5 Run the React App

Start the React development server:

npm start

Your React app should now be running, and you can interact with the ChatGPT model by typing messages and receiving responses.

Conclusion

Integrating ChatGPT with a Node.js backend and React.js frontend involves setting up a server to handle API requests and a frontend to interact with the user. By following the steps outlined in this guide, you can create a seamless chat experience powered by OpenAI’s GPT-4.

For professional development and custom solutions, hire the RND Experts team to develop your WordPress theme and plugin, ensuring robust and scalable applications tailored to your specific needs.